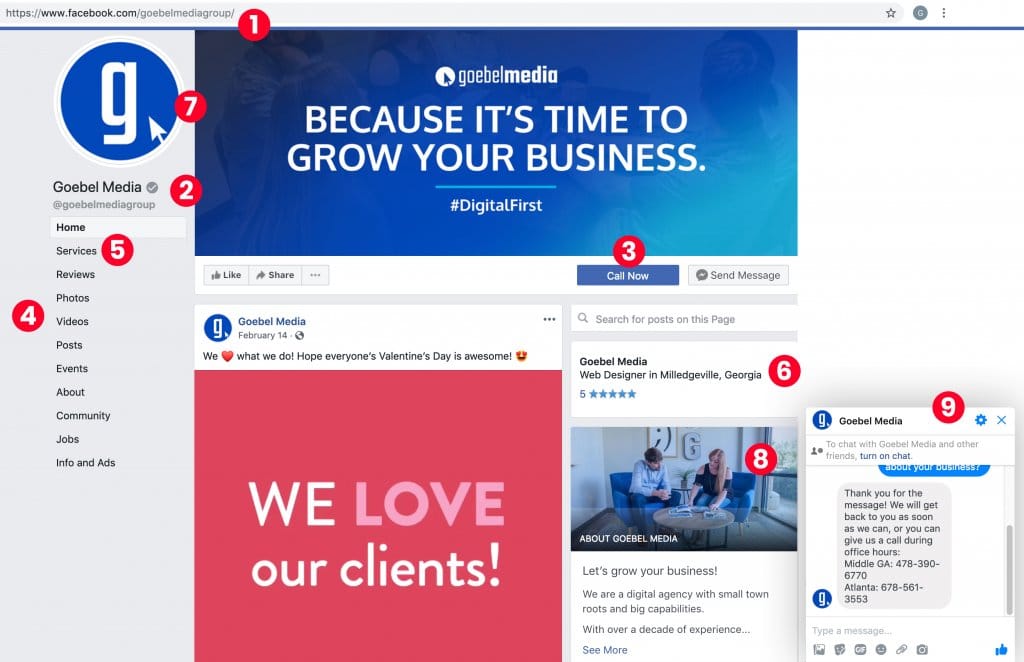
- Set a Vanity URL
This is a branded URL for your business’s Facebook page that places your username after the facebook.com web address. (Ex: www.facebook.com/YourBusiness). Vanity URLs are more professional, easier to remember, and give you the ability to put your Facebook page URL on marketing materials.How do I set my username for my URL?
Go to your Facebook profile’s “About” tab and set a username under “General.”Note: Choose a username you’ll be happy with for the long term. It may or may not be changeable in the future! - Get Your Page Verified (if possible)
Note: Not all businesses can attain Facebook’s verification tag, which appears as a check next to your page’s name.
Navigate to your Facebook page, click “Settings” in the top right, then under “General,” you will see an option for Page Verification. You can opt to have Facebook call your page’s publicly listed phone number to give you a verification code or a longer process that involves submitting documents. We recommend going with the first option if possible. - Set a Call to Action
Underneath your cover photo, you will see a blue Call to Action button. If you have not set this yet, it should say “+ Add a Button.” Facebook gives you various options for this button so set the one that is best for your business. - Determine Your Tabs
Facebook tabs help enhance the user experience. These tabs appear in the left sidebar of your page. To edit the tabs, go to the “Settings” link at the top of your page then click “Templates and Tabs” on the left side of the screen. There, you can add, remove, and order the tabs.
- Add Your Service Listings
Follow the instructions above to set a “Services” tab for your page. Then, navigate to your page and click “Services” in the left hand sidebar. Click “Add a Service,” enter information about the service, then click “save.” Do this for each of your business’s service offerings. - Set your Business’s Categories
The category of your business appears below your page’s name and helps people understand what your business is all about. You can set up to 3 categories. To edit your category, click “About” on the left sidebar of your page then click “Edit” next to category. - Update Your Creative
It is important to keep your creative strategy on social media fresh and on brand and in tune with your current marketing message. We recommend a profile picture that is recognizable at a small size. For most businesses, this would mean your logo or a simplified logo mark. For personal brands, this could mean a headshot. You should also update your cover photo from time to time, with the average being about every quarter. There are free tools such as Canva.com for DIYers that have templates that are properly sized. However, we always recommend having a professional review your creative strategy. - Write Your “Story”
Not to be confused with the Facebook stories that disappear after 24 hours, your business’s “story” is now part of your Facebook business profile. To update your story, navigate to your Facebook page, click the “About” tab on the left sidebar, and your Facebook story section will be on the right side of the page. Add a strong image (preferably different than your cover photo), title, and your story. We recommend a short story that explains what your business does and how it can help your customers. - Set Custom Automated Messenger Responses
Automated Messenger responses are messages that are sent automatically when a new customer sends your page a Facebook message. Responding automatically can have many benefits such as keeping response time numbers low and answering common questions without having to manually respond. You can set ‘away’ messages and send automated replies for common questions such as asking for location or contact information. To set automated responses: Click Inbox at the top of your Page then Click Automated Responses in the left column. We recommend setting your ‘away’ message and to look into setting the ‘common questions’ available for your page.
